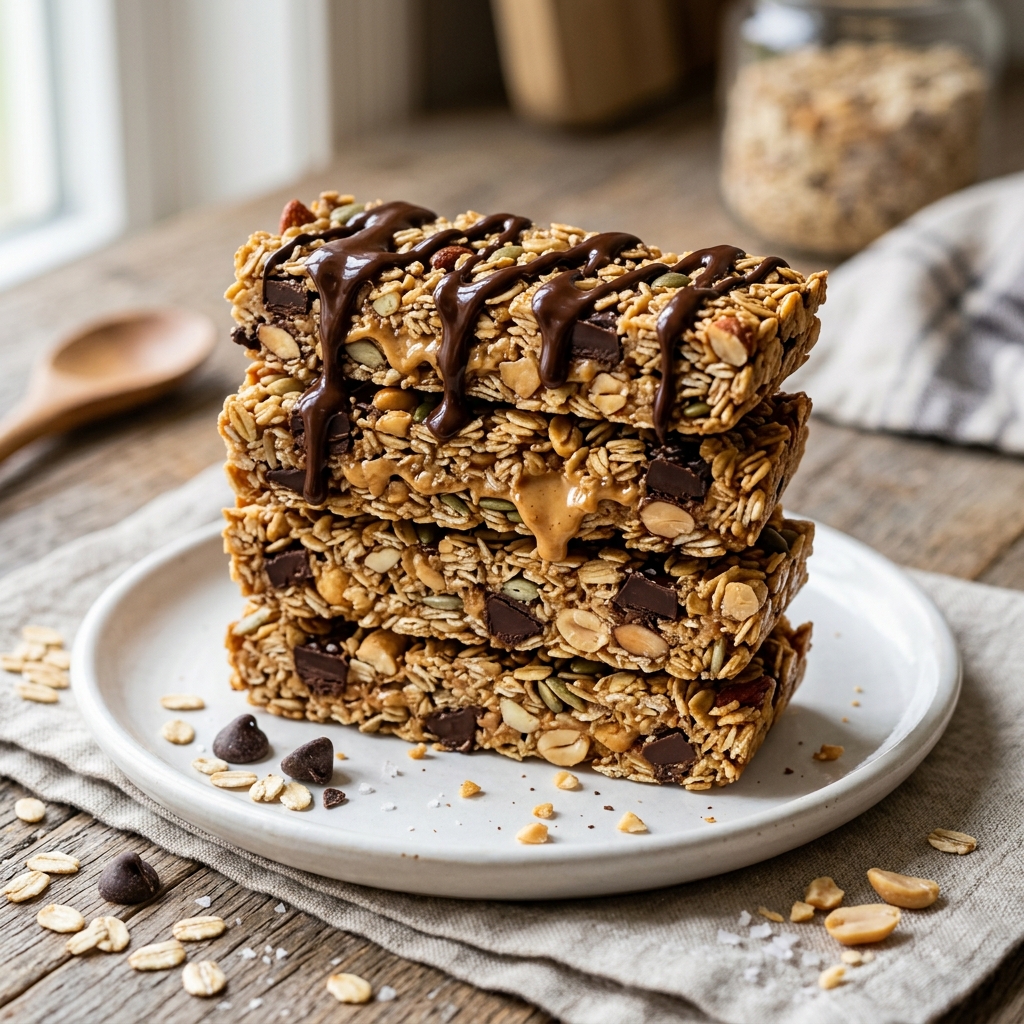
There’s something incredibly satisfying about biting into a perfectly made granola bar—the gentle crunch of toasted oats, the subtle sweetness of honey, and the rich nuttiness that lingers on your palate. But what if you could create that same wholesome, delicious experience right in your own kitchen, using simple, nourishing ingredients you trust? That’s exactly what this homemade granola bars recipe offers: a perfect balance of flavor, texture, and nutrition, crafted with care and intention.
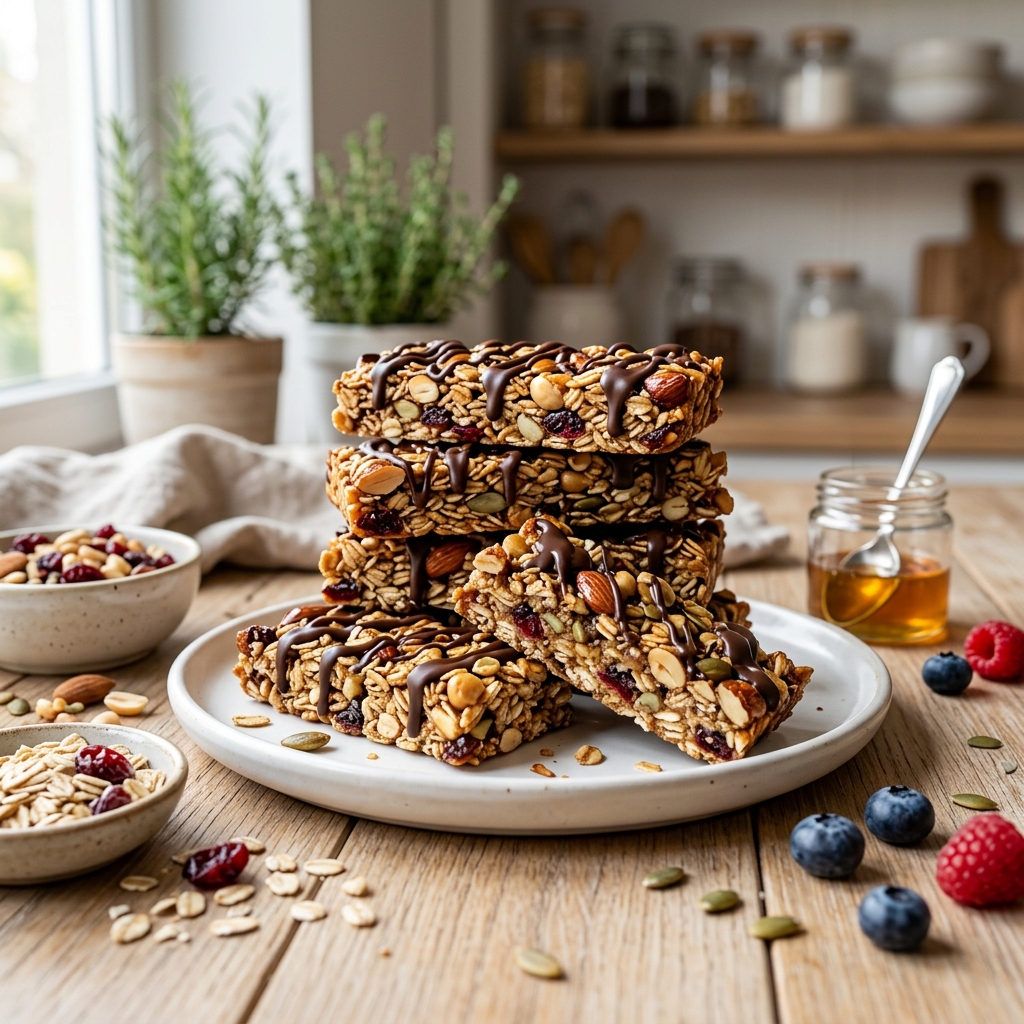
In a world where store-bought snacks often come packed with hidden sugars and preservatives, making your own granola bars is more than just a recipe—it’s a lifestyle upgrade. Whether you’re preparing quick breakfasts, fueling your busy afternoons, or looking for a healthier snack option for your family, these granola bars deliver both convenience and quality. And the best part? They’re incredibly easy to make, even if you’re not an experienced cook.
Why You’ll Love This Recipe
Imagine having a batch of golden, chewy granola bars ready whenever hunger strikes—no last-minute grocery runs, no mystery ingredients, just pure, homemade goodness. These bars are designed to be both satisfying and energizing, making them ideal for busy mornings, post-workout snacks, or even a light dessert.
What truly sets this recipe apart is its flexibility. You can customize it to suit your taste preferences, dietary needs, or whatever ingredients you already have in your pantry. From crunchy nuts to chewy dried fruits, every bite can be tailored to your liking. It’s a recipe that invites creativity while delivering consistent, delicious results every single time.
Another reason to love these granola bars is their texture. They strike that perfect middle ground—firm enough to hold their shape, yet soft and chewy enough to melt in your mouth. Achieving this balance is what transforms a simple snack into something truly memorable, and this recipe guides you through every step to get it just right.
Ingredients for Homemade Granola Bars
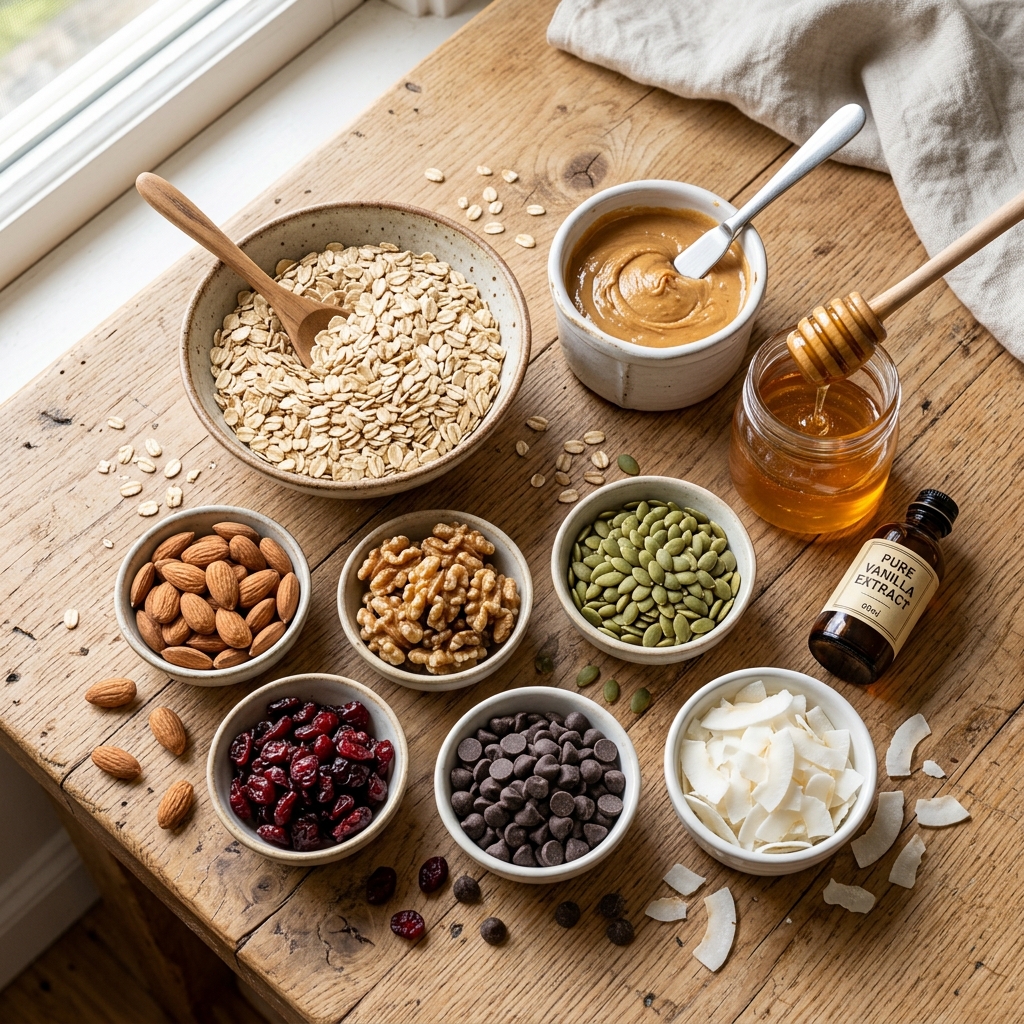
Creating the perfect granola bar starts with choosing high-quality ingredients. Each component plays a crucial role in flavor, texture, and nutritional value, so understanding what goes into your bars will help you achieve the best results.
Base Ingredients
- Rolled Oats (2 cups)
The foundation of any great granola bar. Use old-fashioned rolled oats for the best texture—they provide a hearty chew and hold up well during baking or chilling. Avoid quick oats, as they can make the bars too soft and crumbly. - Mixed Nuts (1 cup, chopped)
Almonds, peanuts, walnuts, or cashews all work beautifully. Nuts add crunch, healthy fats, and a rich, nutty flavor. Lightly toasting them beforehand enhances their taste significantly. - Seeds (½ cup)
Pumpkin seeds, sunflower seeds, or chia seeds bring extra nutrition and texture. They’re excellent sources of fiber, protein, and essential minerals.
Binding Ingredients
- Honey (½ cup)
A natural sweetener that also acts as a glue to hold everything together. Honey gives the bars a warm, floral sweetness and helps create that chewy consistency. - Peanut Butter or Almond Butter (½ cup)
This adds creaminess and richness while helping bind the ingredients. Choose a natural, unsweetened version for the best flavor and health benefits.
Flavor Enhancers
- Dried Fruits (¾ cup)
Cranberries, raisins, chopped dates, or apricots add bursts of sweetness and chewiness. They also bring natural sugars and a pop of color. - Vanilla Extract (1 teaspoon)
A small addition that makes a big difference. Vanilla enhances all the other flavors and gives the bars a warm, inviting aroma. - Salt (¼ teaspoon)
Just a pinch helps balance the sweetness and intensify the overall flavor.
Optional Add-Ins
- Dark Chocolate Chips (½ cup)
For a touch of indulgence, dark chocolate adds richness and depth. It pairs beautifully with the natural sweetness of the bars. - Coconut Flakes (¼ cup)
Adds a subtle tropical flavor and extra texture. - Protein Powder (optional)
Perfect if you want to turn your granola bars into a post-workout snack.
Step-by-Step Preparation Guide
Making homemade granola bars is straightforward, but a few key techniques ensure they turn out perfectly every time. Follow these steps carefully for the best results.
Step 1: Prepare Your Workspace
Start by lining an 8×8-inch baking pan with parchment paper. Leave some overhang on the sides—this will make it easier to lift the bars out later. Lightly grease the paper to prevent sticking.
Step 2: Toast the Oats and Nuts
Preheat your oven to 350°F (175°C). Spread the rolled oats and chopped nuts evenly on a baking sheet and toast them for about 8–10 minutes, stirring halfway through. This step enhances the flavor and gives the bars a deeper, nuttier taste. Let them cool slightly before mixing.
Step 3: Warm the Binding Ingredients
In a small saucepan over low heat, combine the honey and peanut butter. Stir continuously until the mixture becomes smooth and well combined. Remove from heat and stir in the vanilla extract and salt.
Step 4: Combine the Dry Ingredients
In a large mixing bowl, add the toasted oats, nuts, seeds, and dried fruits. If you’re using coconut flakes or protein powder, add them at this stage as well. Mix everything thoroughly to ensure even distribution.
Step 5: Mix Everything Together
Pour the warm honey and peanut butter mixture over the dry ingredients. Using a spatula or wooden spoon, mix until everything is fully coated. The mixture should be sticky and slightly thick.
Step 6: Press into the Pan
Transfer the mixture into your prepared baking pan. Using the back of a spoon or a flat-bottomed glass, press it down firmly and evenly. This step is crucial—pressing tightly ensures the bars hold together and don’t crumble later.
Step 7: Add Optional Toppings
If you’re using chocolate chips, sprinkle them on top and gently press them into the surface. For a smoother finish, you can melt the chocolate and drizzle it over the bars.
Step 8: Chill or Bake
For no-bake bars, place the pan in the refrigerator for at least 2 hours until firm.
If you prefer baked bars, bake at 325°F (160°C) for 15–18 minutes until lightly golden, then allow them to cool completely.
Step 9: Slice and Serve
Once fully set, lift the mixture out using the parchment paper and place it on a cutting board. Slice into bars or squares using a sharp knife. Clean cuts work best when the bars are fully chilled.
Recipe Variations
One of the greatest strengths of homemade granola bars is their versatility. You can easily adapt this recipe to suit different tastes and dietary preferences.
Nut-Free Version
Replace nuts with extra seeds like sunflower and pumpkin seeds. You can also use seed butter instead of peanut butter.
Vegan Option
Swap honey for maple syrup or agave nectar. Make sure your chocolate chips are dairy-free if using.
High-Protein Bars
Add a scoop of your favorite protein powder and increase the nut butter slightly to maintain the right consistency.
Tropical Twist
Incorporate dried mango, pineapple, and coconut flakes for a bright, tropical flavor profile.
Low-Sugar Version
Reduce the honey slightly and rely more on naturally sweet dried fruits like dates.
Expert Tips for Perfect Granola Bars
Achieving bakery-quality granola bars at home is all about attention to detail. Here are some expert tips to elevate your results:
- Press Firmly and Evenly
This cannot be overstated. Compacting the mixture tightly is the key to bars that hold together well. - Don’t Skip Toasting
Toasting oats and nuts enhances flavor and prevents a raw taste. - Balance Wet and Dry Ingredients
Too many dry ingredients will make the bars crumbly, while too much liquid can make them overly soft. - Let Them Cool Completely
Cutting the bars too early can cause them to fall apart. Patience pays off here. - Use Sharp Knives for Clean Cuts
Wipe the knife between cuts for neat, professional-looking bars.
Make Ahead Options
One of the best things about homemade granola bars is how perfectly they fit into a busy lifestyle. With just a little planning, you can have a week’s worth of healthy snacks ready to go without any daily effort.
If you’re preparing for the week ahead, you can make a full batch and store it in the refrigerator for up to 7 days. Simply slice the bars after they’ve fully set, then place them in an airtight container with parchment paper between layers to prevent sticking. This method keeps them fresh, firm, and ready whenever you need a quick bite.
For longer storage, granola bars freeze beautifully. Wrap each bar individually in parchment paper or plastic wrap, then store them in a freezer-safe bag or container. When you’re ready to enjoy one, just let it sit at room temperature for about 10–15 minutes, or pack it in your bag in the morning—it will thaw naturally by snack time.
If you prefer freshly made texture, you can also prepare the mixture ahead of time and store it unpressed in the refrigerator for up to 24 hours. When ready, simply press it into a pan and chill or bake as directed. This is especially useful when prepping for events or meal planning in stages.
What to Serve with Homemade Granola Bars
Granola bars are incredibly versatile and can be enjoyed on their own, but pairing them with the right foods can turn them into a more complete and satisfying snack or even a light meal.
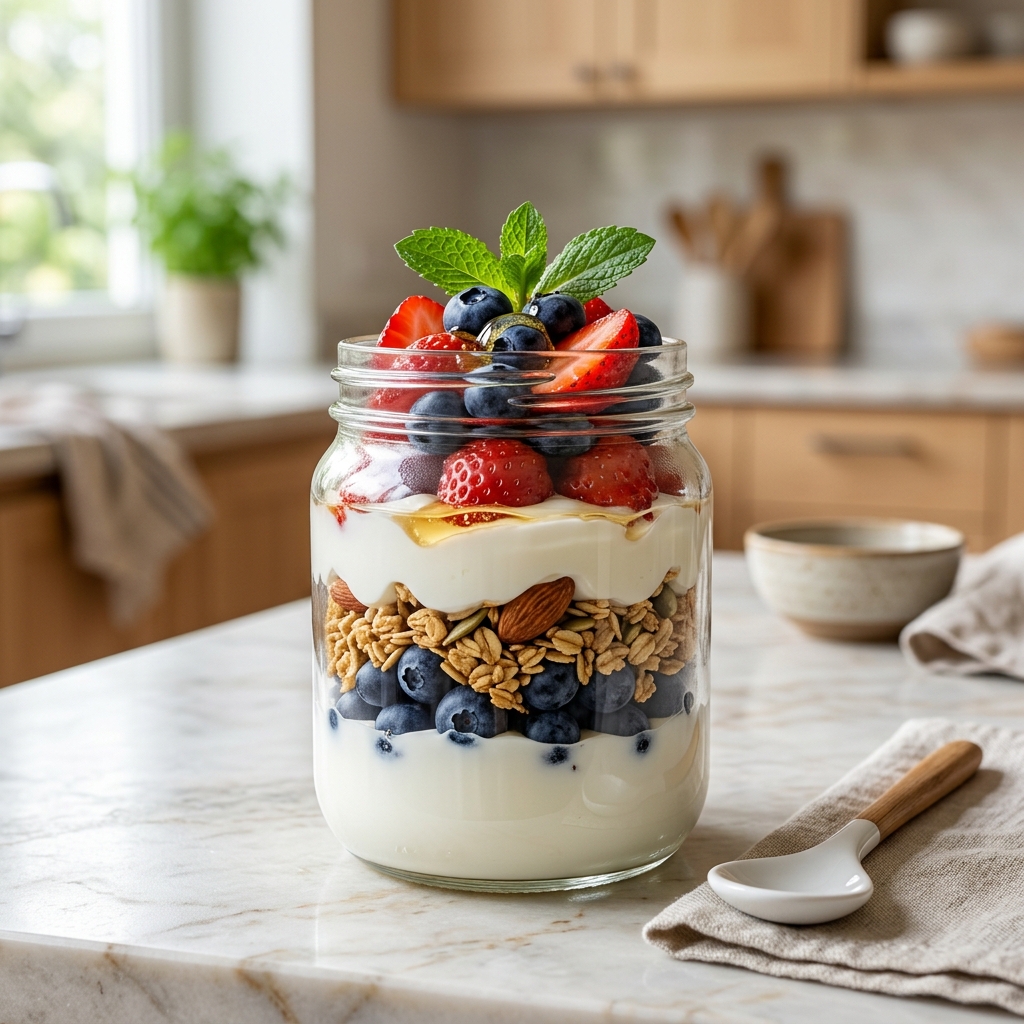
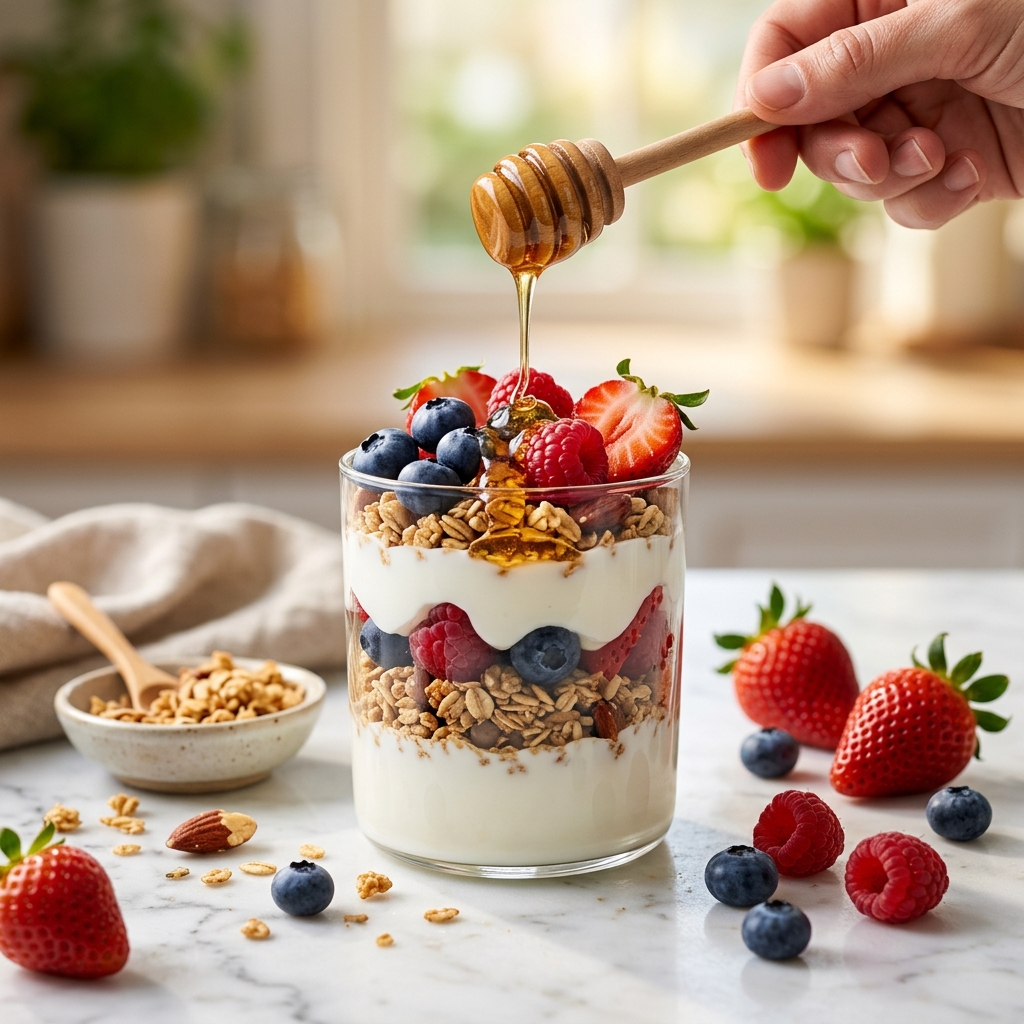
- Yogurt Parfait
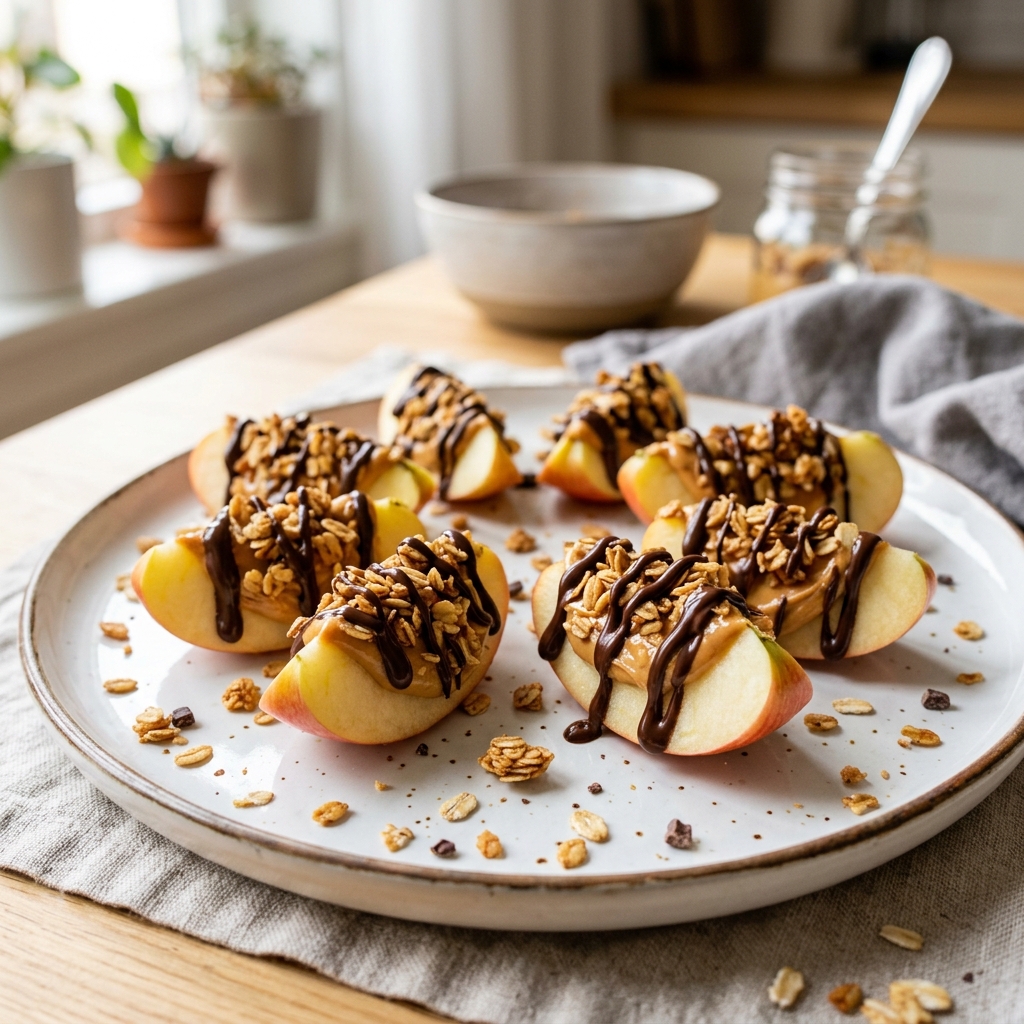
Crumble a granola bar over a bowl of Greek yogurt and top with fresh fruits like strawberries, blueberries, or bananas. This creates a delicious balance of creamy, crunchy, and sweet. - Fresh Fruit
Serve alongside apple slices, orange wedges, or a handful of grapes for a refreshing contrast and added vitamins. - Smoothies
Pair your granola bar with a nutrient-packed smoothie for a quick breakfast or post-workout recovery meal. - Milk or Plant-Based Milk
A simple glass of milk, almond milk, or oat milk complements the texture and flavor of the bars perfectly. - Nut Butter Dip
Spread or dip your granola bar in a little extra peanut or almond butter for added richness and protein. - Tea or Coffee
These bars make an excellent companion to your morning coffee or afternoon tea, offering just enough sweetness without being overwhelming.
How to Store Homemade Granola Bars
Proper storage is essential to maintaining the texture and flavor of your granola bars. Since they are made with natural ingredients and no preservatives, a little care goes a long way.
At room temperature, granola bars can be stored in an airtight container for up to 3 days. Keep them in a cool, dry place away from direct sunlight to prevent them from becoming too soft or sticky.
For longer freshness, refrigeration is the best option. Stored in an airtight container, they will last up to a week while maintaining their structure and chewiness. If your kitchen is particularly warm, refrigeration is highly recommended to prevent the bars from softening too much.
Freezing is ideal for long-term storage. Granola bars can be frozen for up to 2–3 months without losing quality. Just ensure they are well wrapped to avoid freezer burn.
If your bars become too hard after refrigeration, simply let them sit at room temperature for a few minutes before eating. On the other hand, if they’re too soft, a short chill in the fridge will firm them up again.
Frequently Asked Questions (FAQs)
1. Why are my granola bars falling apart?
This usually happens when the mixture isn’t pressed firmly enough into the pan or when there isn’t enough binding ingredient like honey or nut butter. Make sure to compact the mixture tightly and maintain the correct ratio of wet to dry ingredients.
2. Can I make these granola bars without baking?
Absolutely. This recipe works perfectly as a no-bake option. Simply chill the mixture in the refrigerator until firm, and you’ll have soft, chewy bars without using the oven.
3. What can I use instead of peanut butter?
You can substitute peanut butter with almond butter, cashew butter, sunflower seed butter, or even tahini. Each option will slightly change the flavor but still work effectively as a binder.
4. How do I make my granola bars crunchier?
If you prefer a crunchier texture, bake the bars instead of chilling them. You can also toast the oats and nuts a bit longer for extra crispness.
5. Are homemade granola bars healthier than store-bought?
In most cases, yes. Homemade granola bars allow you to control the ingredients, reduce added sugars, and avoid preservatives or artificial flavors commonly found in packaged options.
6. Can I reduce the sweetness?
Yes, you can slightly reduce the honey or replace part of it with mashed bananas or unsweetened applesauce. Keep in mind that reducing sweeteners too much may affect how well the bars hold together.
7. Can kids help make this recipe?
Definitely. This is a great recipe to make with kids since it involves simple mixing and pressing. Just supervise during any steps involving heat.
8. How do I get clean, professional-looking slices?
For neat cuts, use a sharp knife and slice the bars after they are fully chilled or cooled. Wiping the knife between cuts also helps create clean edges.
Conclusion
Homemade granola bars are more than just a snack—they’re a reflection of thoughtful cooking and mindful eating. With their perfect balance of flavor, texture, and nutrition, they offer a simple yet powerful way to take control of what you eat without sacrificing taste or convenience.
Once you’ve made them yourself, it’s hard to go back to store-bought versions. The freshness, the customizable ingredients, and the satisfaction of creating something wholesome from scratch make this recipe truly special. Whether you’re preparing for a busy week, fueling your fitness goals, or simply craving something delicious, these granola bars are a reliable and rewarding choice.
Now that you’ve mastered both the basics and the finer details, you’re ready to create granola bars that not only look beautiful but taste absolutely incredible every single time.

Homemade Granola Bars – Easy Healthy Snack Recipe
Ingredients
Equipment
Method
- Preheat oven to 350°F (175°C) if baking. Line a baking pan with parchment paper.
- Spread oats and chopped nuts on a baking sheet and toast for 8–10 minutes. Allow to cool slightly.
- In a saucepan over low heat, combine honey and peanut butter. Stir until smooth, then remove from heat and add vanilla extract and salt.
- In a large bowl, mix toasted oats, nuts, seeds, and dried fruits.
- Pour the warm mixture over the dry ingredients and mix thoroughly until well combined.
- Transfer mixture into the prepared pan and press firmly and evenly.
- Add chocolate chips on top if using and gently press them in.
- For no-bake: Refrigerate for at least 2 hours until firm.
- For baked: Bake at 325°F (160°C) for 15–18 minutes until lightly golden, then cool completely.
- Remove from pan, slice into bars, and serve.
Notes
Adjust sweetness by reducing honey or using naturally sweet dried fruits.
Store in an airtight container for up to 1 week in the refrigerator or freeze for up to 3 months.
Easily customizable with your favorite mix-ins like chocolate, coconut, or spices such as cinnamon.